Opal Membership Documentation
Getting Started
Firstly, we would like to thank you for purchasing Fullhouse Wordpress theme and chosen it for your website. We outline all kinds of good information, and provide you with all the details you need to use the Wordpress theme.
If you are unable to find your answer here in our documentation, feel free to ask for help from our support team, all you have to do is submitting a ticket via our Support Ticket system or email us: [email protected].
If you like this theme, Please support us by rating us 5 stars (How to rate?)
Opal Membership
Today, Opal Team , we very happy to introduce with you plugin "Opal Membership".One of plugins, that developed by our technicals.
Opal Estate plugin will help you to create membership and help you have a discount when you submit property, do not take more your time.
Install Plugin
- Step 1: Navigate to Appearance → Themes in your WordPress admin dashboard.
- Step 2: Click the Add New button at the top of the page and go for the Upload option.
- Step 3: Choose Fullhouse_theme.zip then click Install
- Step 4: Wait while the theme is uploaded and installed then activate the theme.
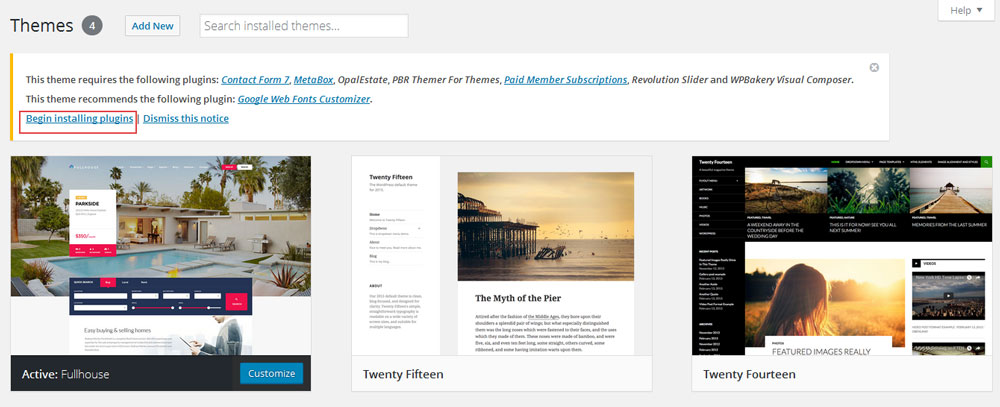
Right after the theme was activated, a notification at the top of the screen will suggest to continue with the installation of the plugins recommended for getting the best our of your theme.
Follow the installation steps below:
Step 1. Click ‘Begin installing plugins‘ and select the plugins you need to install from the list.
Step 2: Select all plugins then choose Install , Click Apply to install all plugins
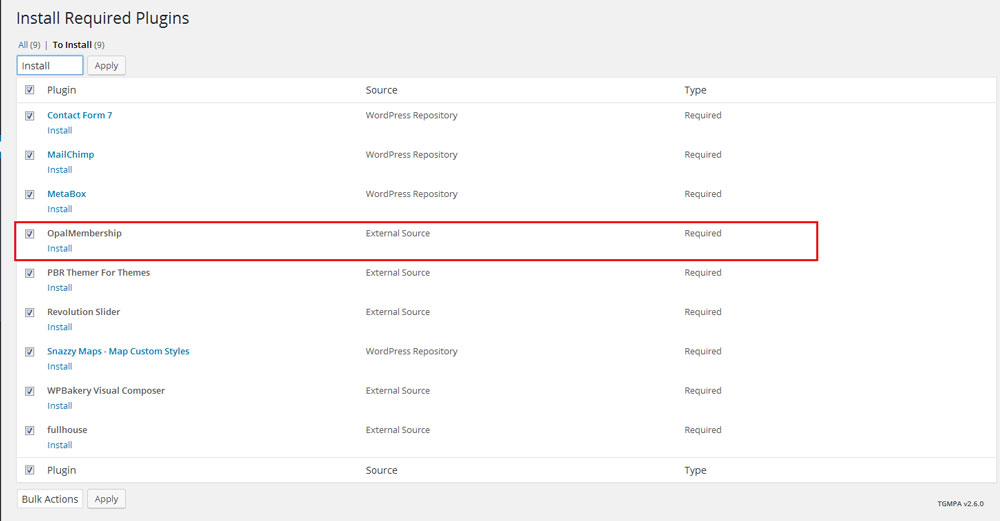
Step 3: Select all plugins then choose Active , Click Apply to active all plugins
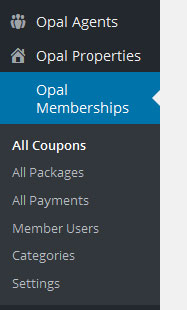
When Plugin Opal Membership is actived, you will see all function of Opal Membership display in right side:
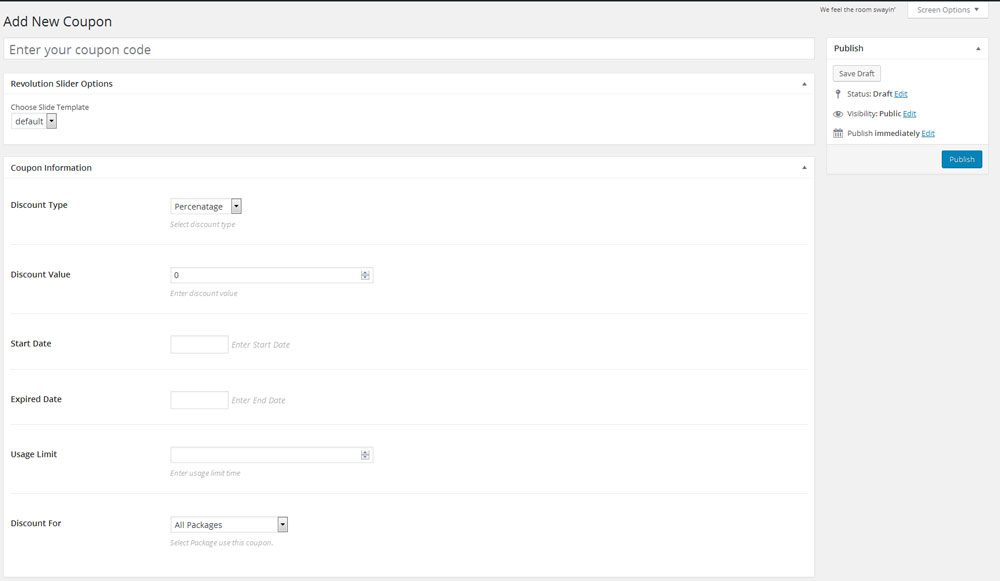
Set Up Coupons
Step 1- Login to the WordPress Dasrdoard. Step 2- From the 'Appearance' menu on the left-hand side of the Dashboard, select the ' " Opal Memberships" .Step 3 - Select button "Add New Coupon" at the top of the page.
- Step 4: - Start filling in the blanks: enter your page title in the upper field .
- Step 5: - As needed, select config Coupon Information setting.
Set Up Packages
Create Membership
Step 1 - Log in to your WordPress Administration Panel (Dashbroad)
Step 2 - Click the 'Opal Memberships' tab
Step 3 - Click the 'All packages' sub-tab.
Step 4 - Click the 'Add New Package
Step 5 - Start filling in the blanks: enter your membership title in the upper field, and enter your subcription plans body content in the main subcription plans editing box below it.
Step 6 - As needed, setting option in Package information.
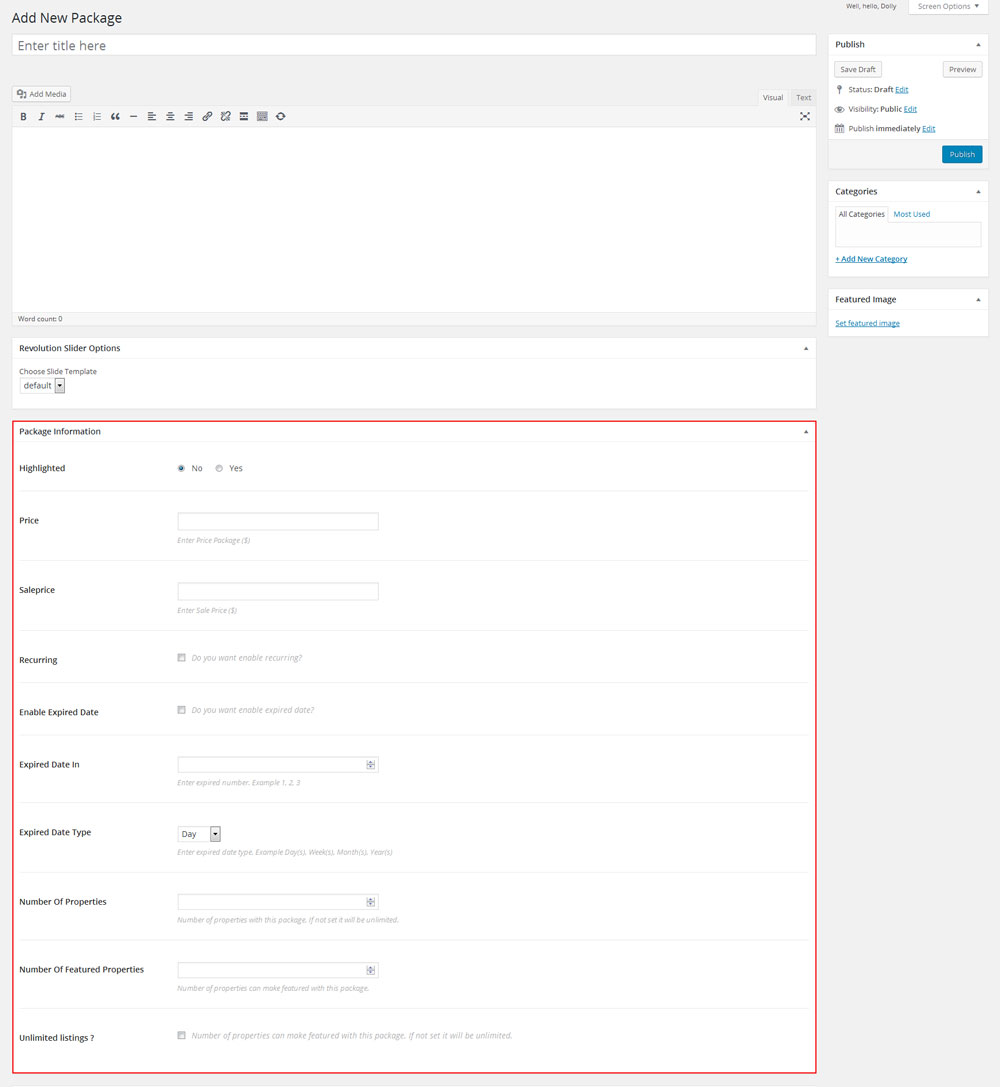
Step 7 - When membership is readly, click button "Publish".
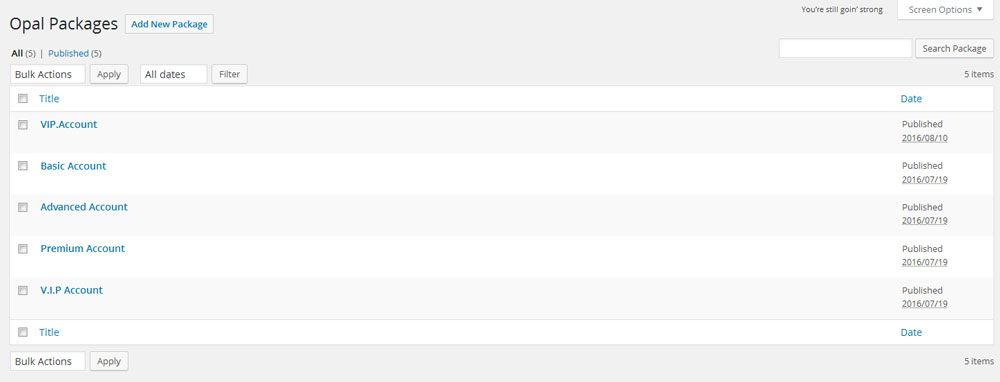
Subcription plans look like:
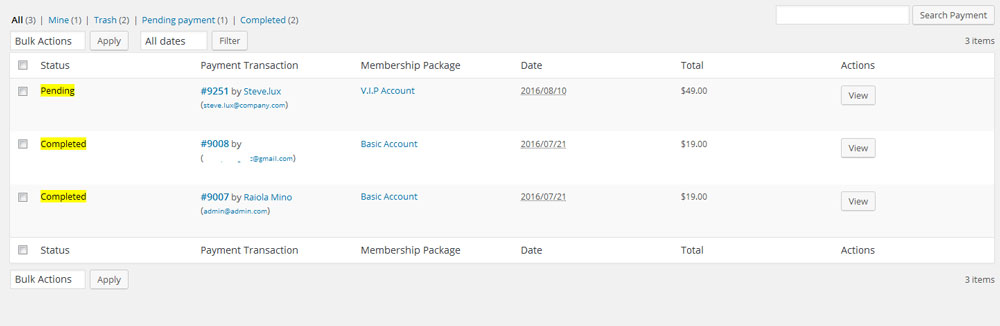
Set Up Payments
Step 1 - Log in to your WordPress Administration Panel (Dashbroad).
Step 2 - Click the 'All Payments' tab
It will dislay all payments that user buy membership. When user buy membership, it will display in there. You can edit to completed this payment.
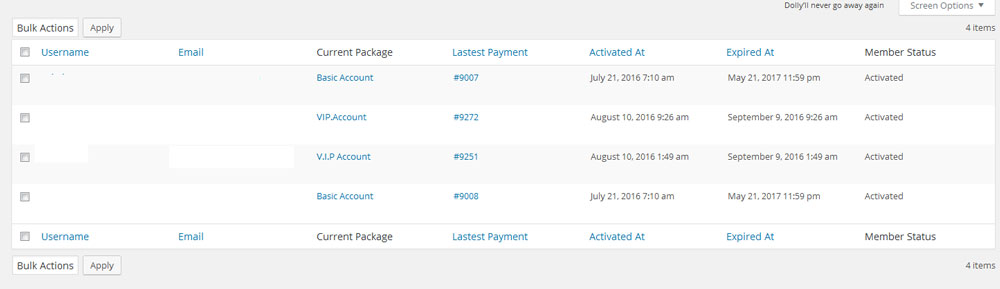
Set Up Member Users
Step 1 - Log in to your WordPress Administration Panel (Dashbroad).
Step 2 - Click the 'Member Users' tab
It will display all users to buy membership.
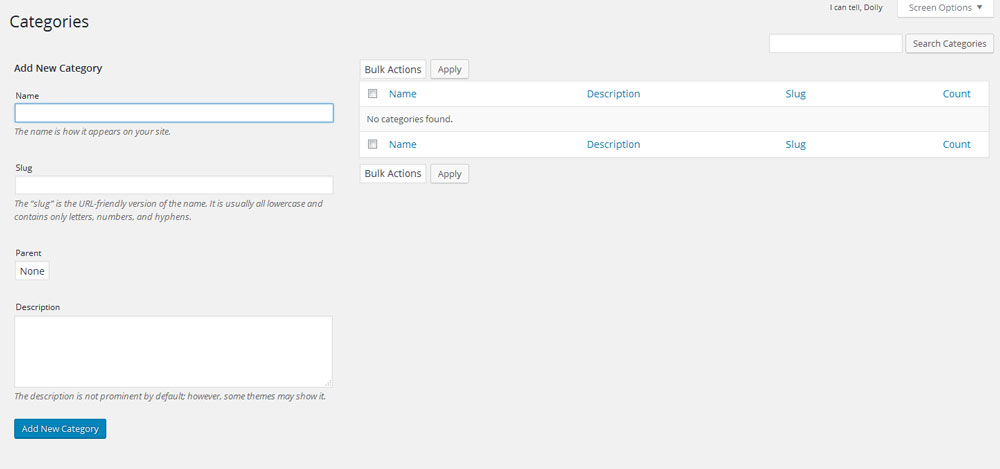
Set Up Categories
Step 1 - Log in to your WordPress Administration Panel (Dashbroad).
Step 2 - Click the 'Categories' tab
Step 3 - Add to category for membership.
Shortcode for Opal Membership
a. Create Shortcode Membership Packages Page
- Step 1: Navigate to Appearance → Page in your WordPress admin dashboard.
- Step 2: Click the Add New .
- Step 3: - Start filling in the blanks: enter your page title in the upper field, and enter shortcode in page .
- Step 4: - As needed, select config layout setting.
The shortcode for Membership Packages Page: [opalmembership_packages]
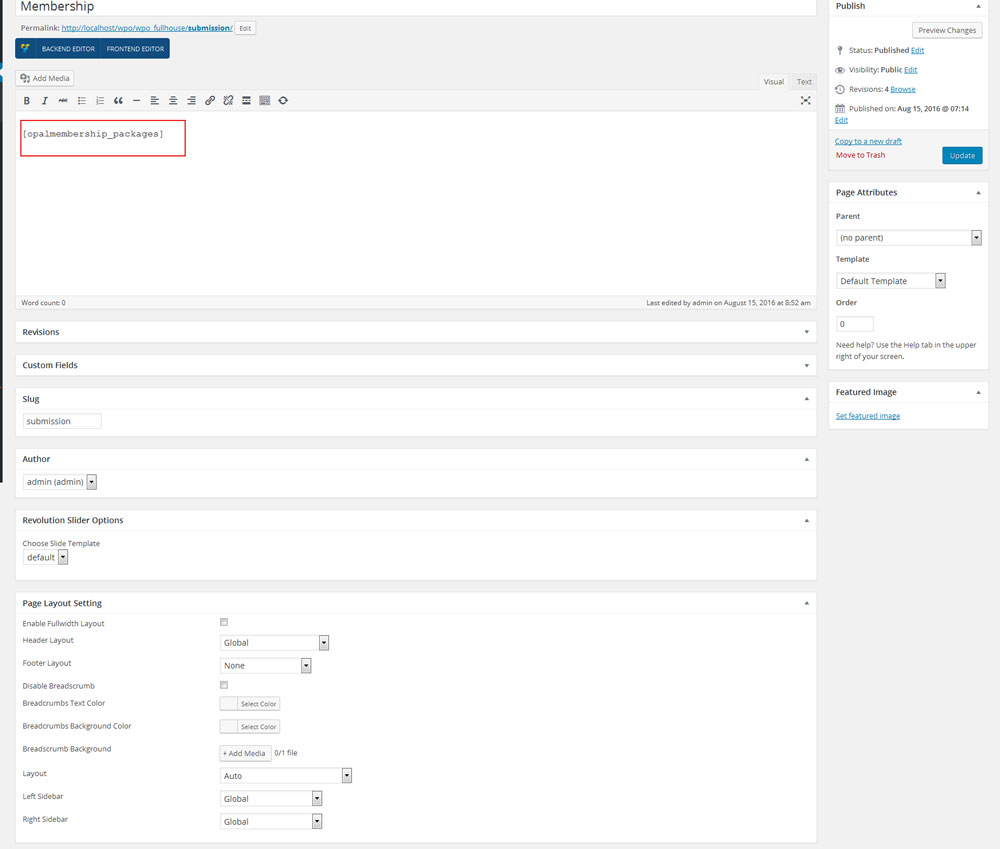
When this page is ready, please click to button "Publish"
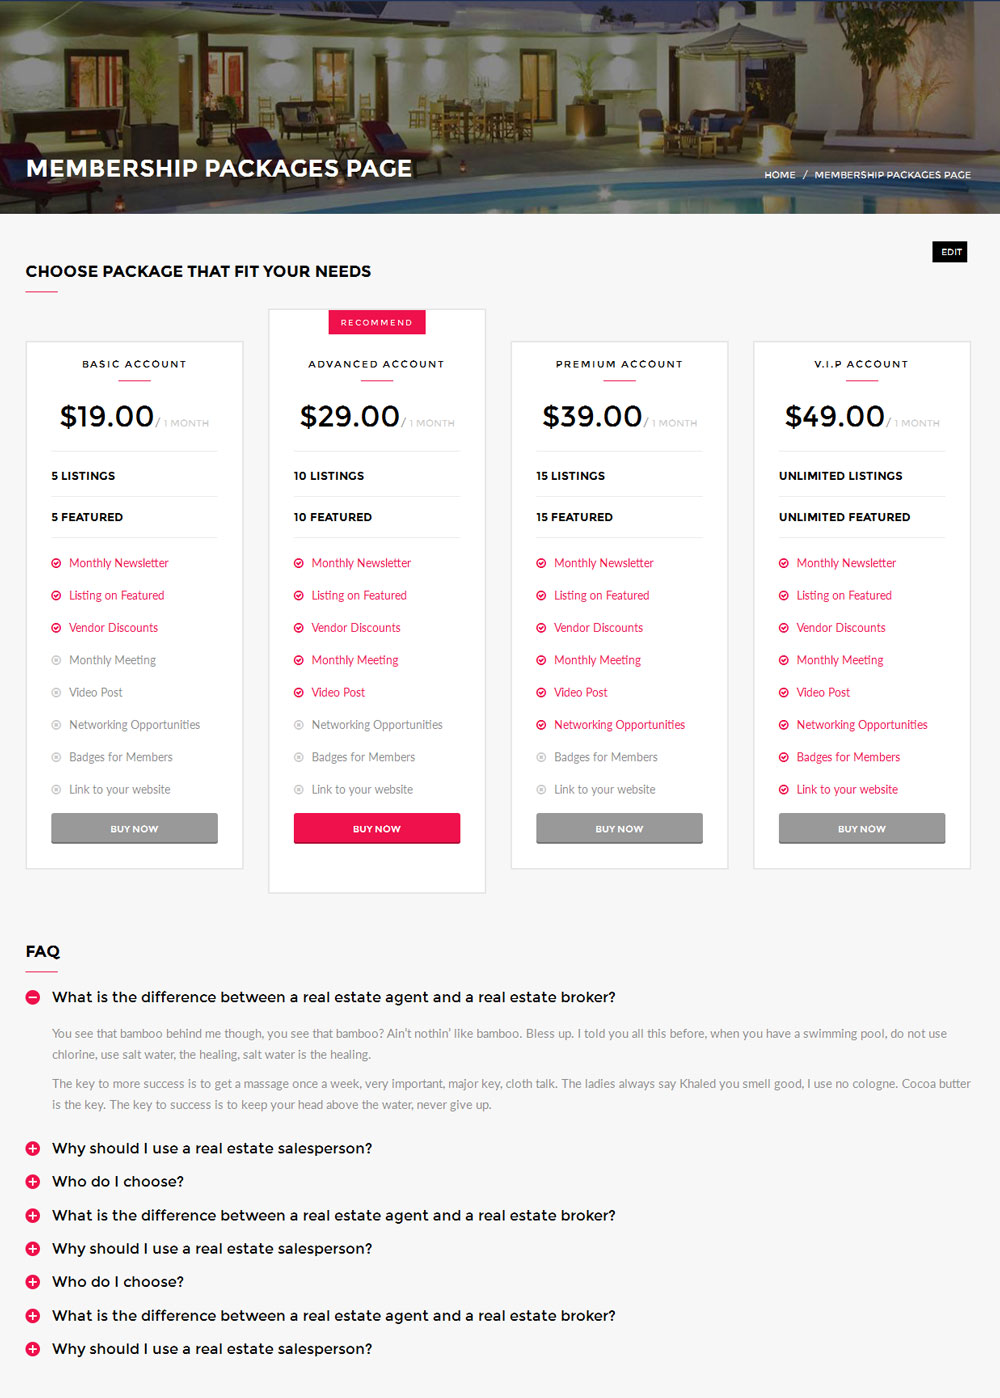
Front-end look like:
b. Create Shortcode Dashboard Page
- Step 1: Navigate to Appearance → Page in your WordPress admin dashboard.
- Step 2: Click the Add New .
- Step 3: - Start filling in the blanks: enter your page title in the upper field, and enter shortcode in page .
- Step 4: - As needed, select config layout setting.
The shortcode Dashboard Page : [opalmembership_dashboard]

When this page is ready, please click to button "Publish"
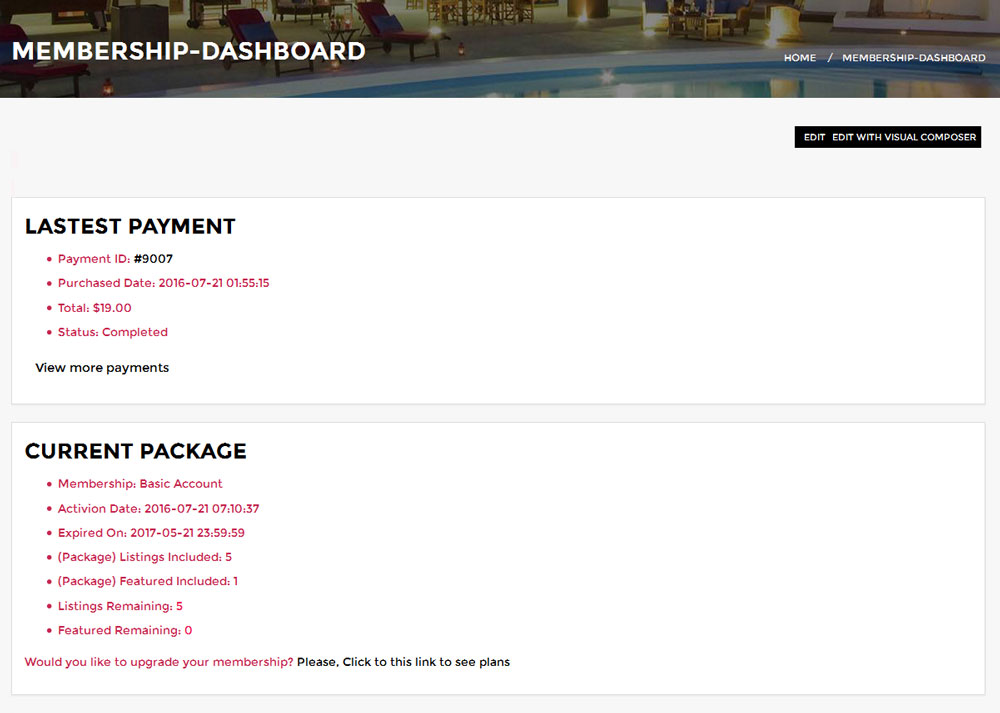
Front-end look like:
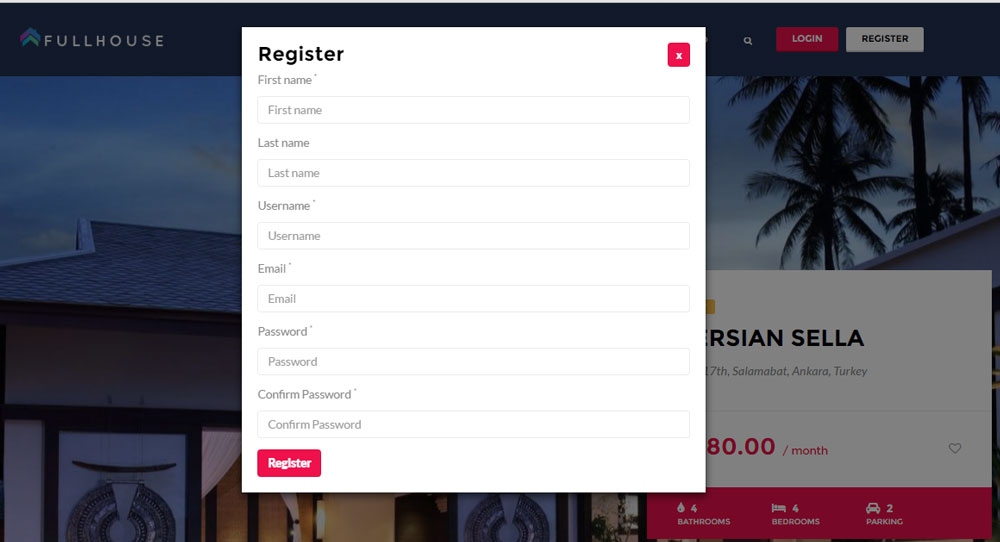
c. Create Shortcode Register Page
- Step 1: Navigate to Appearance → Page in your WordPress admin dashboard.
- Step 2: Click the Add New .
- Step 3: - Start filling in the blanks: enter your page title in the upper field, and enter shortcode in page .
- Step 4: - As needed, select config layout setting.
The shortcode Register Page: [opalmembership_register_form]

When this page is ready, please click to button "Publish"
Front-end look like:
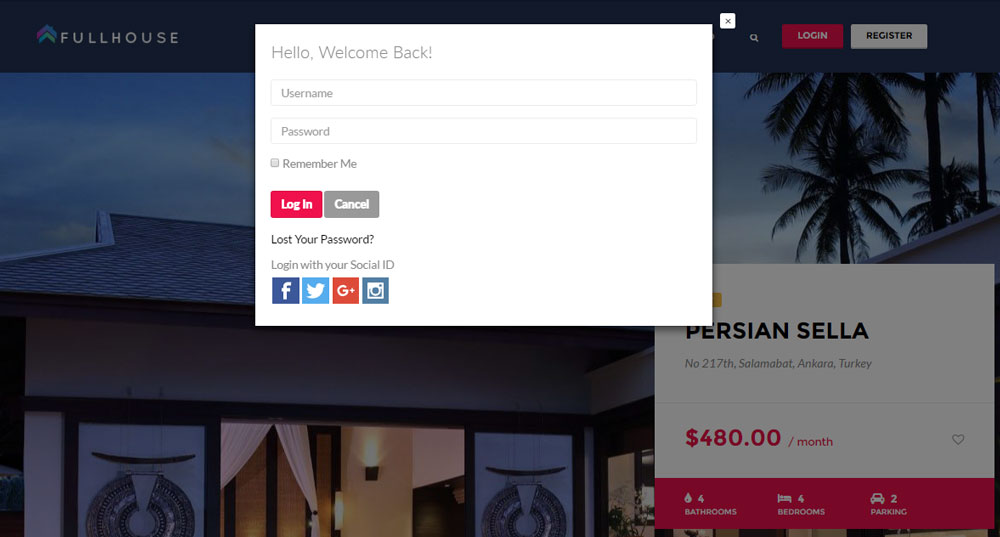
d. Create Shortcode Login Page
- Step 1: Navigate to Appearance → Page in your WordPress admin dashboard.
- Step 2: Click the Add New .
- Step 3: - Start filling in the blanks: enter your page title in the upper field, and enter shortcode in page .
- Step 4: - As needed, select config layout setting.
The shortcode Login Page : [opalmembership_login_form]

When this page is ready, please click to button "Publish"
Front-end look like:
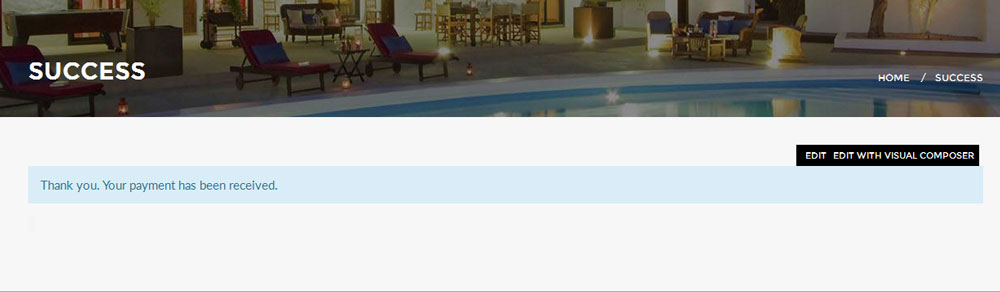
e. Create Shortcode Success Page
- Step 1: Navigate to Appearance → Page in your WordPress admin dashboard.
- Step 2: Click the Add New .
- Step 3: - Start filling in the blanks: enter your page title in the upper field, and enter shortcode in page .
- Step 4: - As needed, select config layout setting.
The shortcode Success Page : [opalmembership_receipt]
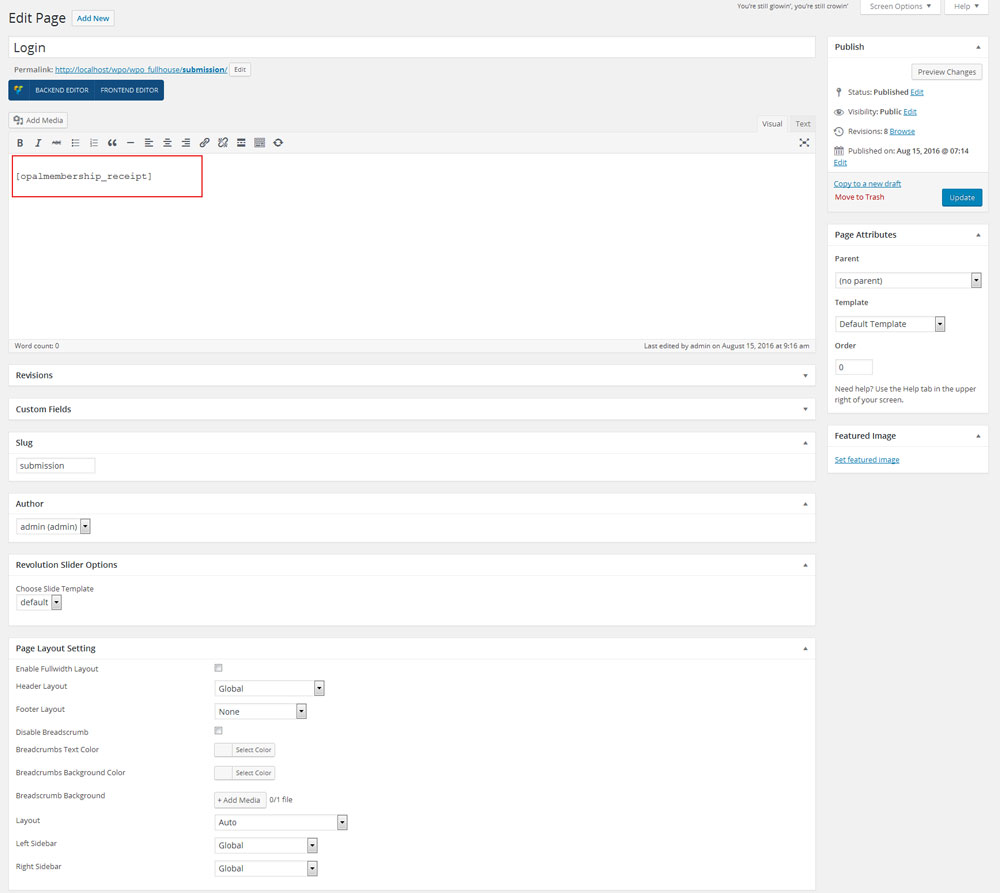
When this page is ready, please click to button "Publish"
Front-end look like:
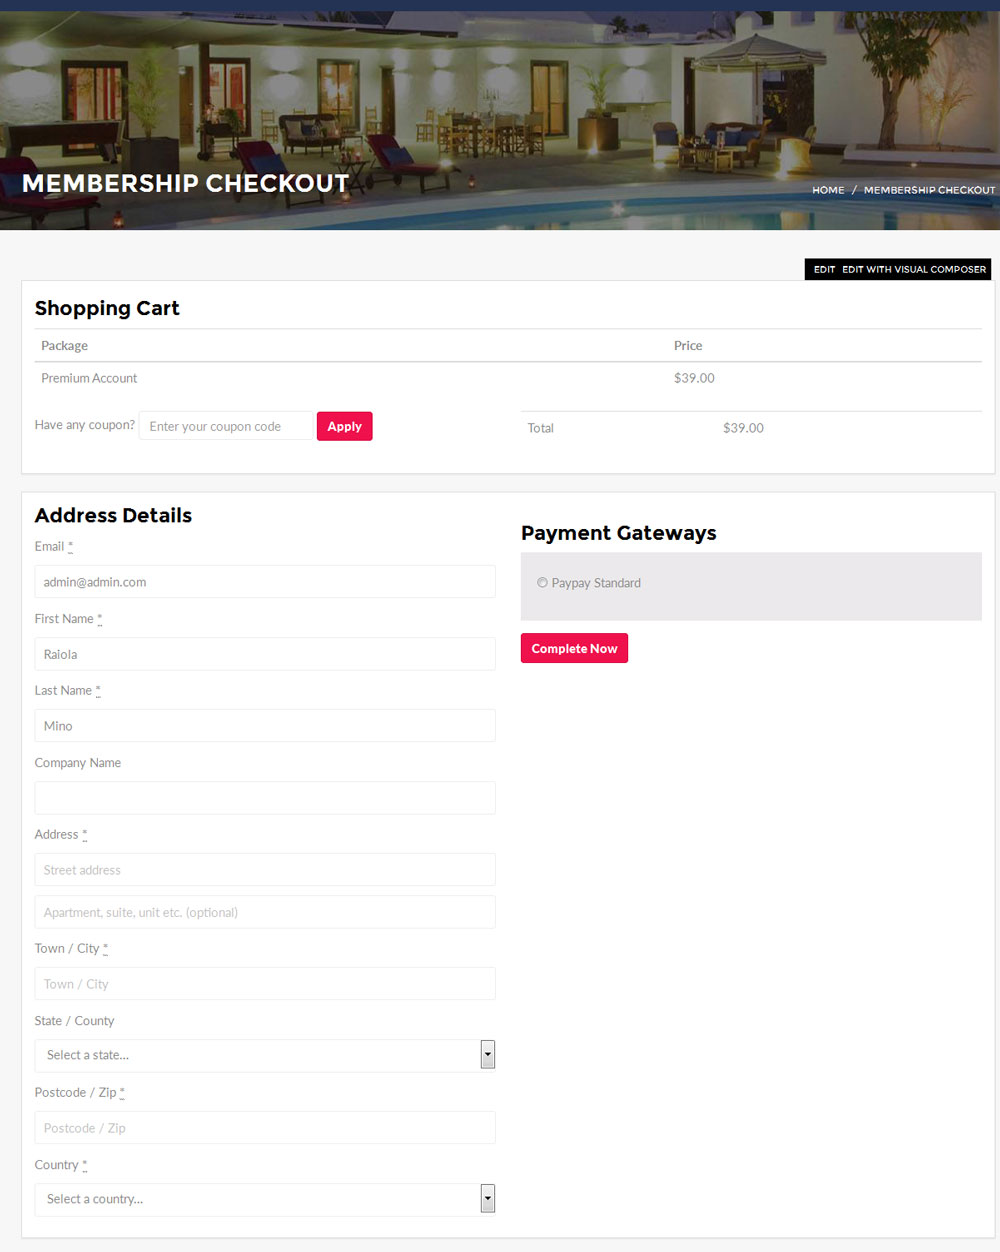
f. Create Shortcode CheckOut Page
- Step 1: Navigate to Appearance → Page in your WordPress admin dashboard.
- Step 2: Click the Add New .
- Step 3: - Start filling in the blanks: enter your page title in the upper field, and enter shortcode in page .
- Step 4: - As needed, select config layout setting.
The shortcode CheckOut Page : [opalmembership_checkout]

When this page is ready, please click to button "Publish"
Front-end look like:
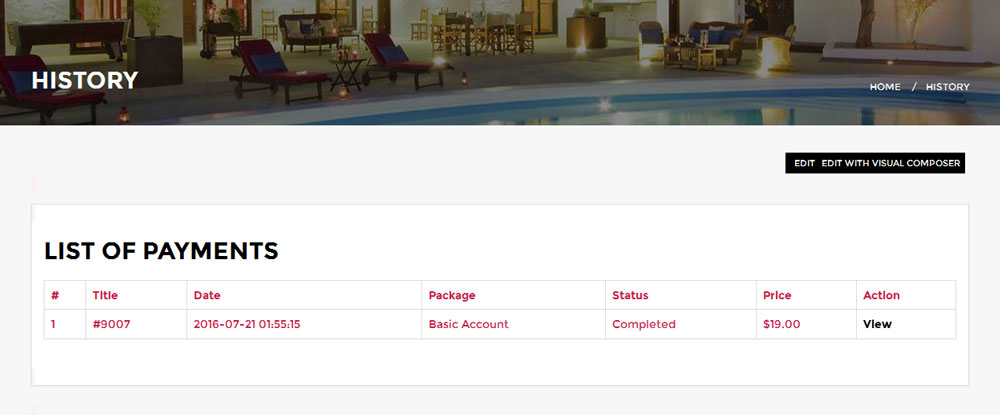
g. Create Shortcode Payment History Page
- Step 1: Navigate to Appearance → Page in your WordPress admin dashboard.
- Step 2: Click the Add New .
- Step 3: - Start filling in the blanks: enter your page title in the upper field, and enter shortcode in page .
- Step 4: - As needed, select config layout setting.
The shortcode Payment History Page : [opalmembership_checkout]
When this page is ready, please click to button "Publish"
Front-end look like:
Set Up Settings
Step 1 - Log in to your WordPress Administration Panel (Dashbroad).Step 2 - Click the 'Setting' tab
Step 3 - Click the 'General' sub tab
Select config for page Setting.
+ Grid Column: To set number column display in membership page.
+ Membership Packages Page: To choose page membership package.
+ Dashboard Page: Select page to diplay page management.
+ Register Page: Select page to display form register.
+ Login user after register completed: Click choose option to login auto.
+ Login page: Select page to display form login.
+ Success page: Choose page succed , it will display when buy membership completed.
+ Checkout Page: Choose page check out to setting page.
+ Payment History Page: Choose page to set up page payment.
+ Enable guest checkout: Choose checkbox, guest will check out without login.
+ Base Country: Choose country to set up location of your site.
+ Currency Settings: To set currency for membership.
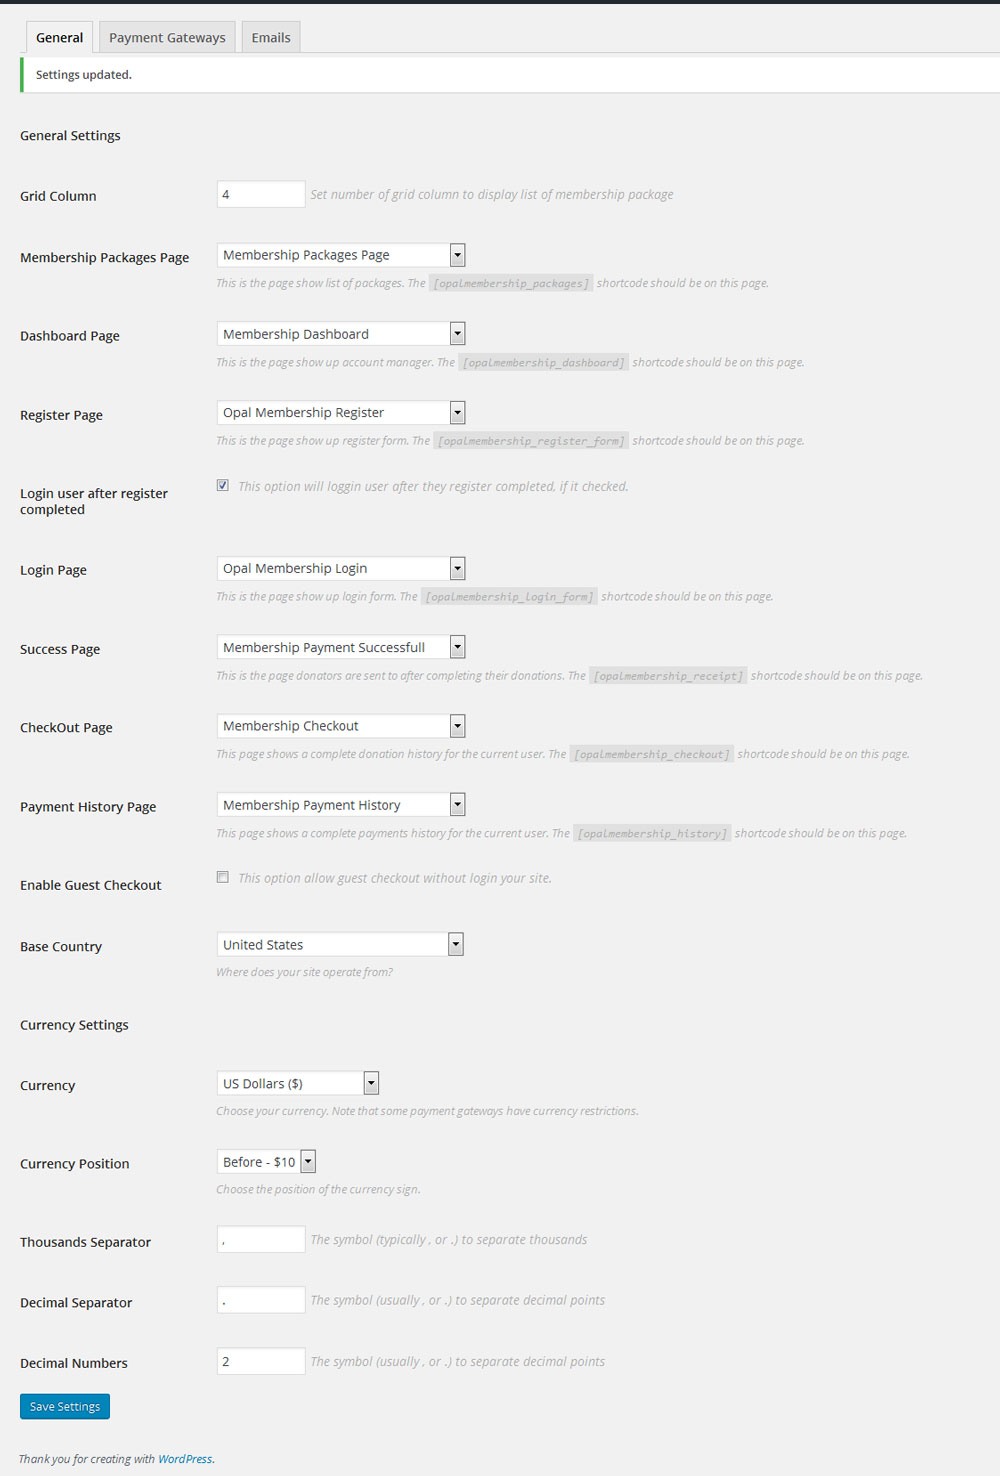
choose method of payment.
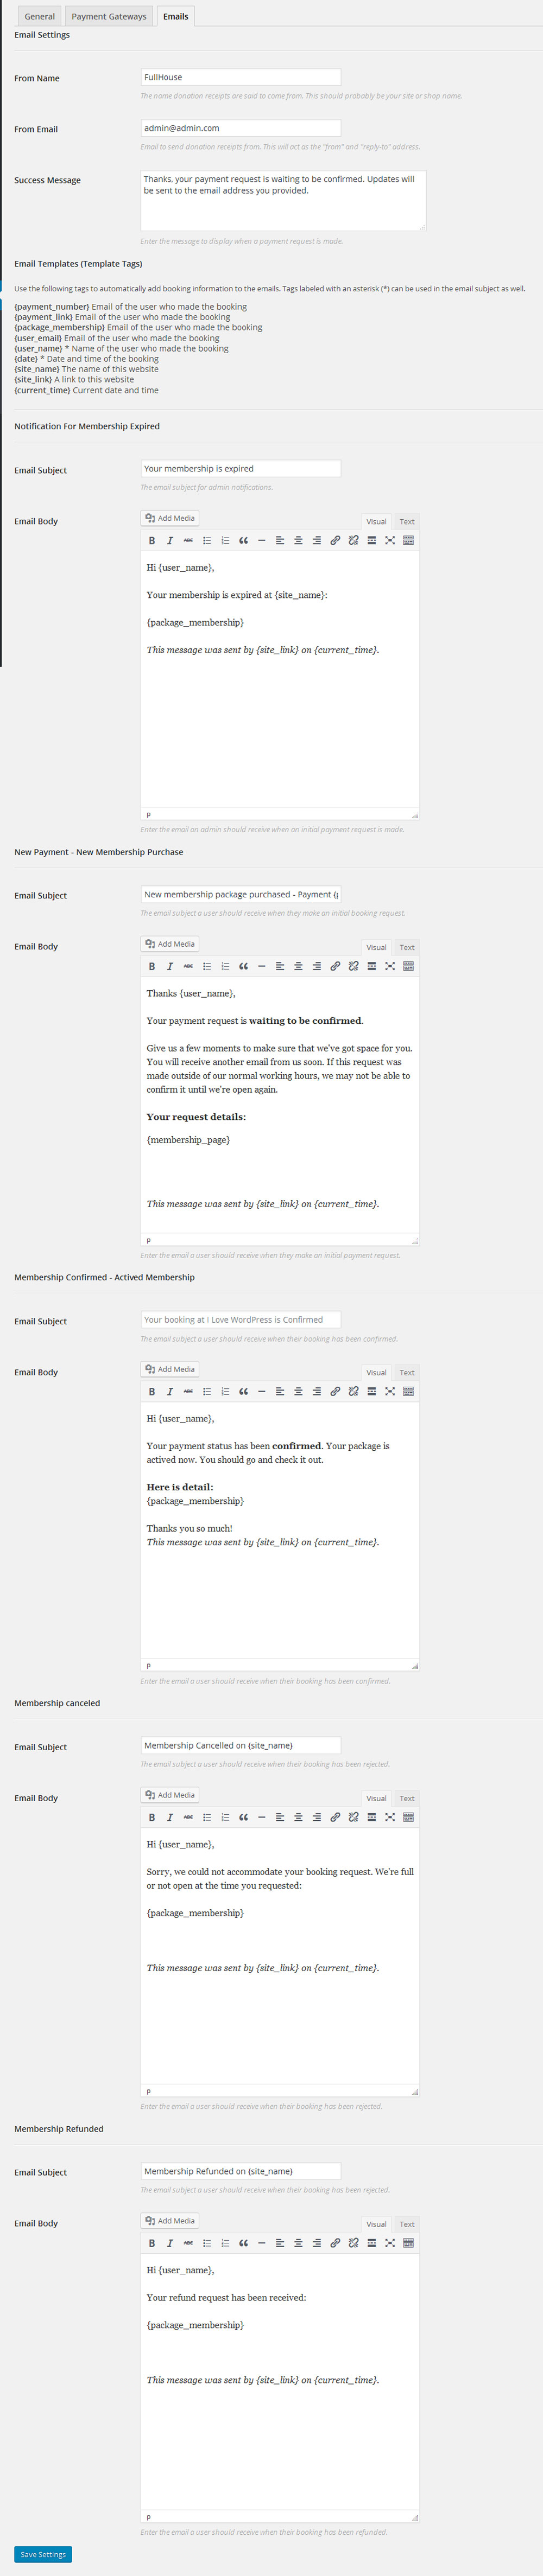
Step 5 - Click the 'E-mails' sub tabInput all box in emails tab.
Get Support
If you are unable to find your answer here in our documentation, please take a photo screenshot with description detail about your problem or idea. Send all to email : [email protected] or ticket: [email protected]. Our technical team will check and try their best to help
Our support scope
Our support covers configuration, building site as demo, trouble using any features, and bug fixes. We don't provide support for customizations or 3rd party extension.
Our support time
We try our best to monitor the email around the clock, however, this is not always possible due to different time zones. We will try to reply you as fast as we can.
Our working time is 8.00 AM - 5.30 PM, Monday to Friday (GMT+7). So if ask for help in the weekend, you may have to wait a little bit for support and please be patient.