Every business or personal project should have its own web presence. Owing a website is a proven way to make your brand more noticeable and engage a wider audience. The launch of every web project is made up of a series of the compulsory steps that everyone needs to follow in order to create an effective and usable site.
In this post, we are going to introduce you to the step-by-step guide on how to build create a website on the basis of a ready-made theme. Launching web projects has become possible without extra help. Simply follow the guide and see it for yourself.
Choose the Right Platform
What kind of a website do you want to launch? Is that a business or portfolio site? Do you want to start a blog or an eCommerce web project? For each of these goals, there is a platform that will help you achieve the necessary effect at it best.
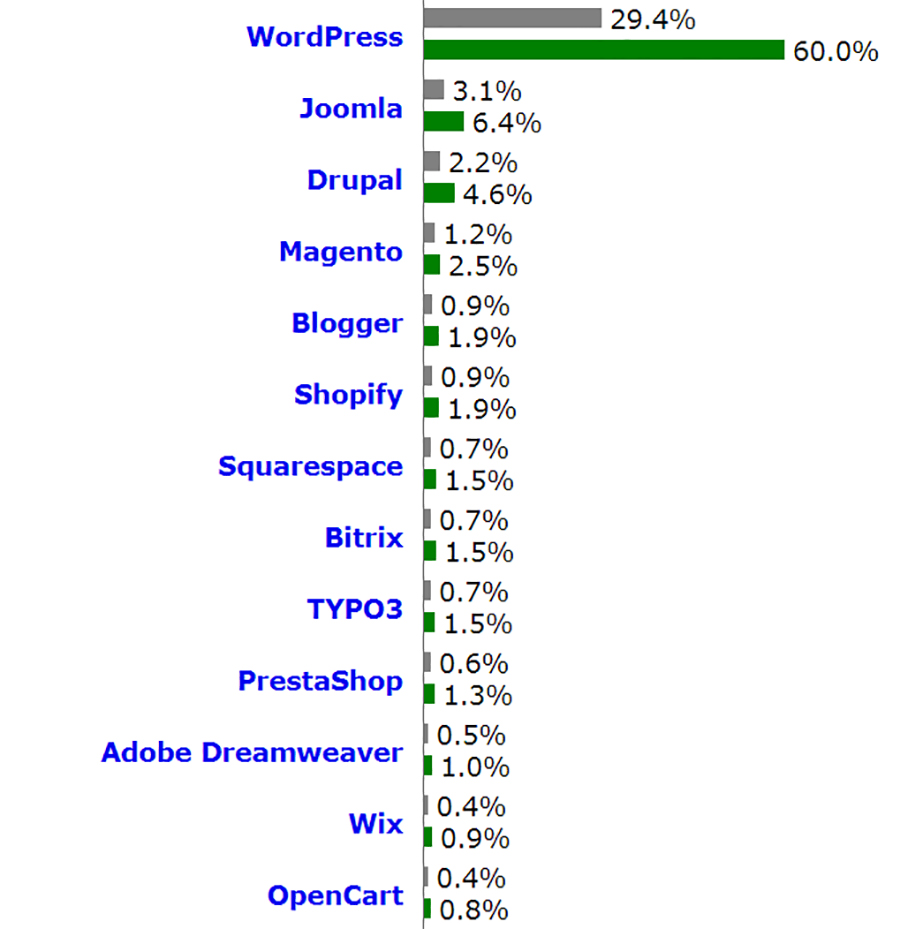
There are dozens of platforms and content management systems available on the contemporary web. According to the most recent stats shared by W3Techs, WordPress is the most popular CMS for 2018. It’s being used by 29,4% of all websites available on the modern-day web, i.e. a content management system market share of 60%.
WordPress is no longer the blogging-only CMS. Over the years, it has grown into a powerful platform that is intended to be used for building online projects of all levels of difficulty and for multiple niches. For example, the truly vast online community offers plenty of plugins, modules and extensions, which can be used for personal sites, creative portfolios, corporate web projects, and even eCommerce sites.

Taking into account such a huge popularity of the CMS and the wide choice of functionality that can boost its performance, we strongly recommend you to use this CMS to build a powerful and competitive online resource.
Choose a Theme
Here comes the next question to which you need to find an answer before to get straight to the site creation. How do you want to build your site? Do you want to create a custom-made project from scratch? If your answer is “yes”, then you should be ready that custom-made web projects are costly. It will also take you more time to build a site from scratch (compared to the process of the site creation on the basis of a ready-made theme. Moreover, you will need to have a strong command of HTML and CSS. If you have little to no coding skills and want to get your site launched within the shortest period of time, then working with the ready-made themes will be the optimal choice for you.
Luckily, there are plenty of pre-designed WordPress themes that you can choose from. The last-generation WordPress themes may come loaded with the drag-and-drop page builders and the possibilities to tweak ready-made designs in the visual mode. Such functionality is of the greatest use to the non-techies and users who launch their first projects on the web. Expert webmasters can also benefit from the themes integrated with the visual builders. With their help, site development becomes twice more cost-effective and time-saving.
Choose a Domain and Web Hosting
In order to set up any website, there are two basic things that you need to consider. These are the domain name (the URL address of your site) and web hosting (a service through which your site will connect with the worldwide web).
Although WordPress CMS is available for free download, the domain name and hosting are paid options. Don’t get upset. Both of them will cost you $3-$5 per month on average. Still, it’s up to you to decide on the best web hosting provider that you can rely on.
Why do you need a unique domain name? This will make your brand stand out from the competition. A domain name that contains the name of your brand or some peculiarities that characterize your brand will make you more memorable.
A number of web hosting providers include free domain names in the cost of their premium plans. Bluehost is the most popular web hosting provider for WordPress sites. It’s cool and affordable. The free domain name, free site builders, 1-click WordPress install, and 24/7 support are included in the pricing plans. Depending on the size of your site, the number of visitors, storage space, backup space, RAM, and backup space needed, be ready to pay $19,99 or higher for the Bluehost WordPress hosting services.
How to Choose a Domain Name
What kind of the web project are you going to launch? Is that a personal or a business project? If you create a website for your business, make sure that the domain name matches your company name. If you launch a personal or a portfolio site, then YourName.com will be just fine.
As a rule, domain names end up with .com, .org or .net. However, recently a number of businesses started to bring creative finishes to their sites. So, don’t be surprised if you reach a which with the domain name ending with .pizza or .agency. This is made possible with the help of the variety of domain extensions that are available on the modern-day web. It’s up to you to make the choice.
If you already have a domain name, simply enter it in the respective field and click ‘next‘.

Enter Your Account Details
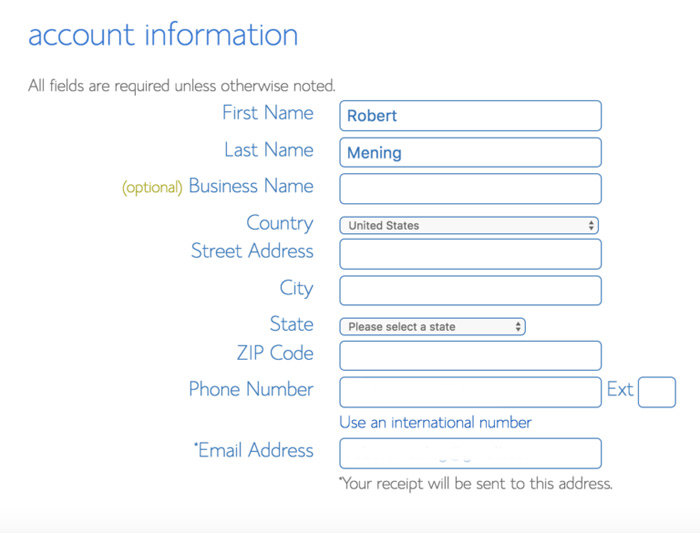
Next, you will be asked to fill in your personal details in the account page. This is where you will be asked to enter your first and last name, country, address, email address, etc.

As soon as you enter the personal information and select the payment method, select the WordPress hosting plan that meets your expectations, create the password, and proceed to the customization of your site.
Site Set Up
The majority of the web hosting companies provide 1-click WordPress installation. This is especially useful to the beginners who have never worked with the CMS before. Once you sign up with Bluehost, you will find the “1-click installation” option in your account control panel. In order to install WP with 1 click, find the WordPress icon in the control panel -> chose the domain name -> click Install Now. That’s all. You are now provided with the access to your new WordPress site.
Choose a Theme
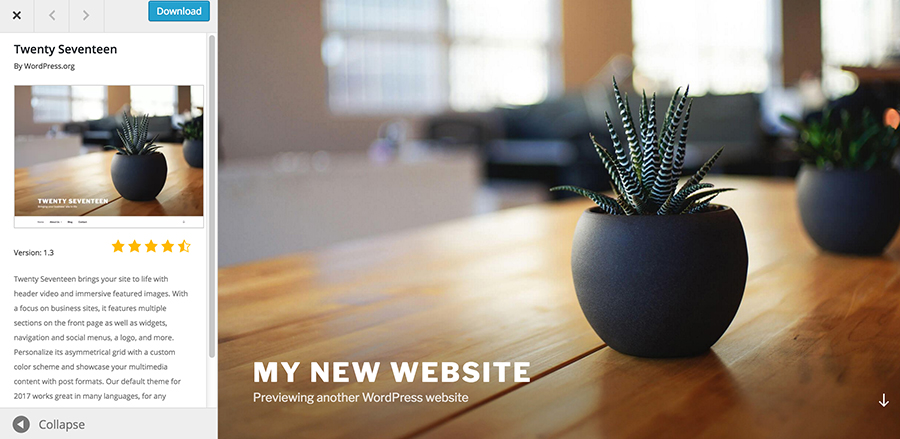
As soon as WordPress installation to your domain is over, you will see a simple default design like this:

In order to make your site look unique, you can either create a custom design or opt for the ready-made WordPress themes. There are plenty of free and premium designs available in the community. Most of the free themes from wordpress.org will be available to you via the control panel. You can preview any of them and install to your site in a matter of minutes.
If you want to work with a free WordPress theme, then navigate to Appearance – > Themes in the left sidebar of your dashboard.
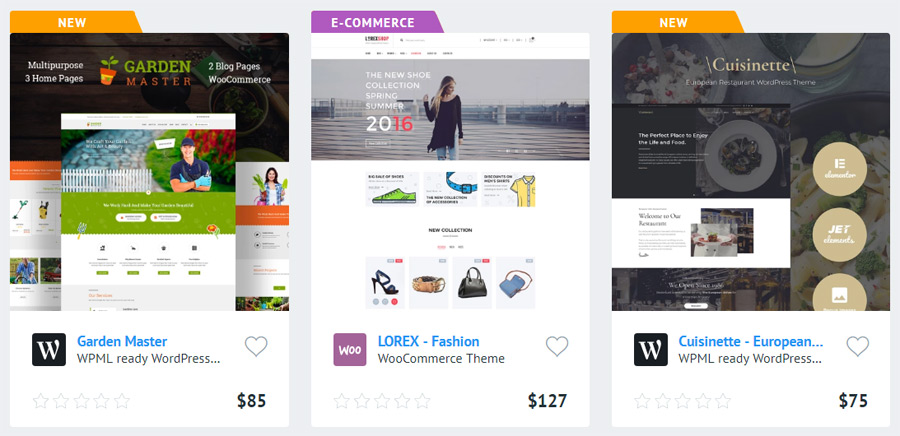
If you want to bring a more original presentation to your site, then premium WordPress template for software company will be your best choice. There are plenty of WordPress theme providers available on the web. Our advice is to choose the well-established companies like TemplateMonster marketplace. They provide a collection of 1700+ of premium WordPress themes sold by different vendors from the worldwide. All premium digital products are designed as per the latest web standards, feature rich collections of extensions, detailed documentation, and free 24/7 support.

Whatever option you select – free or premium, you need to install the chosen WordPress theme to your site and activate it. If you install one theme and find another great design after a while, you can go ahead and switch to a new design. All posts, pages, and pieces of content that are already added to your site will be kept safe.
Manage Pages of Your Site
Once the theme is installed, you can start creating pages and uploading them with your content. By the way, if you decide to work with a premium WordPress template, then you will likely find a number of pre-designed pages and design elements in the download package. This will save you plenty of time and efforts during the site construction.
If you work with a freebie that lacks pre-designed page or simply want to add a new page to your site, then navigate to Pages -> Add New in your WordPress dashboard. Next, add title, text, images, videos, and other pieces of content that you want this page to contain.
Editing posts in the WordPress dashboard is rather easy and intuitive. Navigate to Posts -> Add New, and you will see a blank working area in front of you. Apart from the post editing options, take care of the categories and tags of your post. WordPress lets you add as many categories, sub-categories, and tags as you want. These will help your future readers find the necessary pieces of content easily.
Install Plugins
It’s likely that you will need to enhance the performance of your WordPress site with extra features. The CMS is compatible with all plugins, modules, and extensions that are available in the WordPress community. There are both free and premium extensions to choose from. The majority of the top-rated WordPress extensions can be reached at wordpress.org. Premium WordPress themes are also pre-loaded with the custom and paid extensions.
The most popular plugins that you will need to get installed on your site include:
- YOAST SEO for WordPress. With its help, you can optimize the pages and posts of your site for the higher ranking in the search engines. You will be also provided with the intuitive instructions on how to make your content better.
- Google Analytics is the #1 tool needed to keep track of the performance of your site. It will reveal the stats concerning the user behavior, which will help you better understand what content is in the biggest demand among your readers.
- Contact Form 7 will integrate your site with a usable contact form, through which the web users will be able to get in touch with you worry-free.
Customize Design
There are plenty of drag-and-drop website builders available for you to choose from. All featuring intuitive visual interfaces, these allow you to modify the layout of your site while simply dragging and dropping multiple elements. The respective functionality can be added to your site independently in the form of a plugin. There is also an option to choose a premium theme that includes a visual page builder. For example, you can opt for Elementor page builder.
Launch Your Site
Now, your site is ready to go live! If you followed the steps from this guide carefully, then you should finish up with a functional and good-looking site that will attract crowds of the web users. However, the launch of your site is only the place where the story begins. Next, you will need to take proper care of its promotion. Develop smart social media and email marketing campaigns. partner with the reputable businesses from your industry. It’s always a great idea to exchange experience with others.
P.S. If you want to start an eCommerce project but you do not know how to begin, then the following free eBook will provide you with the step-by-step instructions on how to do it right.
Free ebook

